
Best fan settings for gaming pc usually come down to one thing: a fan curve that keeps your CPU and GPU out of the “hot throttle zone” without turning your room into a wind tunnel. If your FPS dips after 20 minutes, your case sounds like a hair dryer, or your temps look fine but noise feels out of control, you’re in the right place.
Fan curves matter because gaming loads are spiky. A game might jump from a menu to a heavy scene and back again, and a flat “silent” profile often reacts too slowly, while an aggressive profile overreacts and ramps constantly. The goal is a curve that reacts early enough to prevent heat soak, but smooth enough to avoid annoying up-and-down noise.
I’ll break down why temps and noise get weird, how to quickly diagnose what’s actually overheating, and a few fan curve presets you can copy, then adjust based on your case airflow and cooler type. You’ll also see the common mistakes that make “perfect curves” fail in real builds.
What “best” fan settings really mean (and what they don’t)
“Best” is not one universal curve. It’s usually a balance between temperature headroom, noise tolerance, and how fast your cooling system reacts. Two PCs with the same CPU can need different curves because cases, coolers, and even room temperature change the behavior.
Here’s a realistic way to define success:
- No thermal throttling during your longest sessions (performance stays consistent).
- Fan noise stays predictable (no constant ramping every 10 seconds).
- Temps stabilize after 15–30 minutes, instead of creeping upward forever.
According to Intel, modern CPUs include thermal protection and can reduce clock speeds to stay within safe operating limits when temperatures rise. In plain terms, if your curve reacts late, the CPU protects itself by slowing down, and you feel it as stutter or FPS drops.
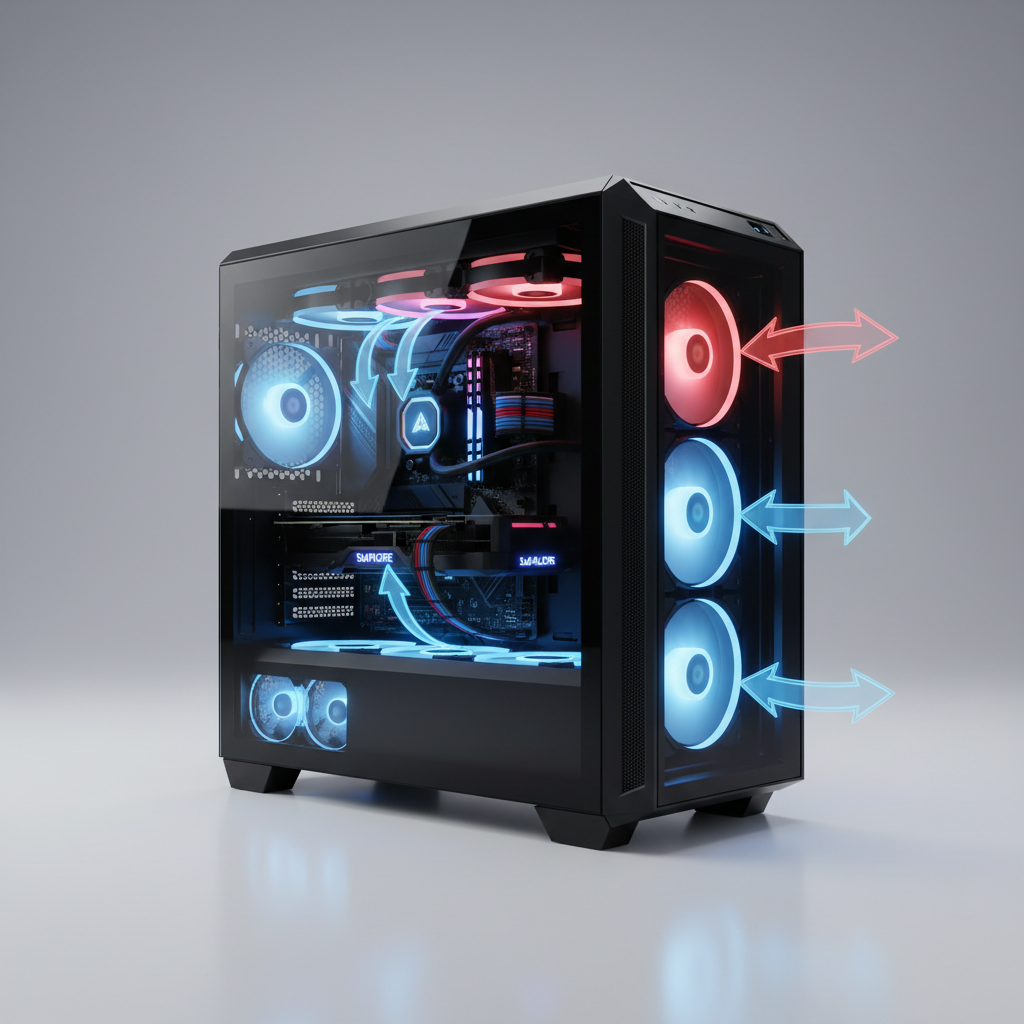
Why your gaming PC runs hot or loud: the usual culprits
Before touching curves, it helps to know what’s driving the problem, because a curve cannot fix a blocked airflow path or a poor sensor choice.
- Heat soak: after 20–40 minutes, the case interior warms up, and temps climb even if initial temps looked fine.
- Wrong control sensor: case fans tied to CPU temperature may ignore a GPU that dumps 300W into the case.
- Fan ramp oscillation: a curve with steep jumps causes audible “revving” as temps bounce around a threshold.
- Negative pressure + dust: too much exhaust, not enough filtered intake, dust builds and temps creep over weeks.
- Cooler limits: small tower coolers or thin AIO radiators may need earlier ramp to prevent spikes.
If you only change settings, you might reduce noise but unknowingly increase heat soak. If you only chase low temps, you might get a loud system that still spikes because the curve reacts too late. The sweet spot sits in between.
Quick self-check: what kind of fan curve do you actually need?
Use this checklist to decide which direction to tune. You don’t need perfect measurements, just consistent observations.
- Your GPU hits 80–85°C+ in games and the case feels warm inside: prioritize case intake/exhaust behavior and GPU-based control.
- Your CPU spikes to 90°C+ during loading screens or shader compilation: prioritize CPU fan response and smoothing.
- Noise is the main issue but temps look reasonable: reduce steep jumps, add hysteresis/delay, and cap top-end RPM.
- Temps creep upward over time: raise mid-range fan speeds (40–70°C zone) rather than only increasing the “100% at 85°C” point.
- Fans constantly ramp in light gaming: add a flatter section at low temps and use a longer step-up time.
For monitoring, you want CPU package temp, GPU hotspot (if available), GPU edge temp, and fan RPM. According to NVIDIA, GPU Boost behavior depends on power and temperature headroom, so keeping GPU temps under control often helps sustain boost clocks in longer sessions.
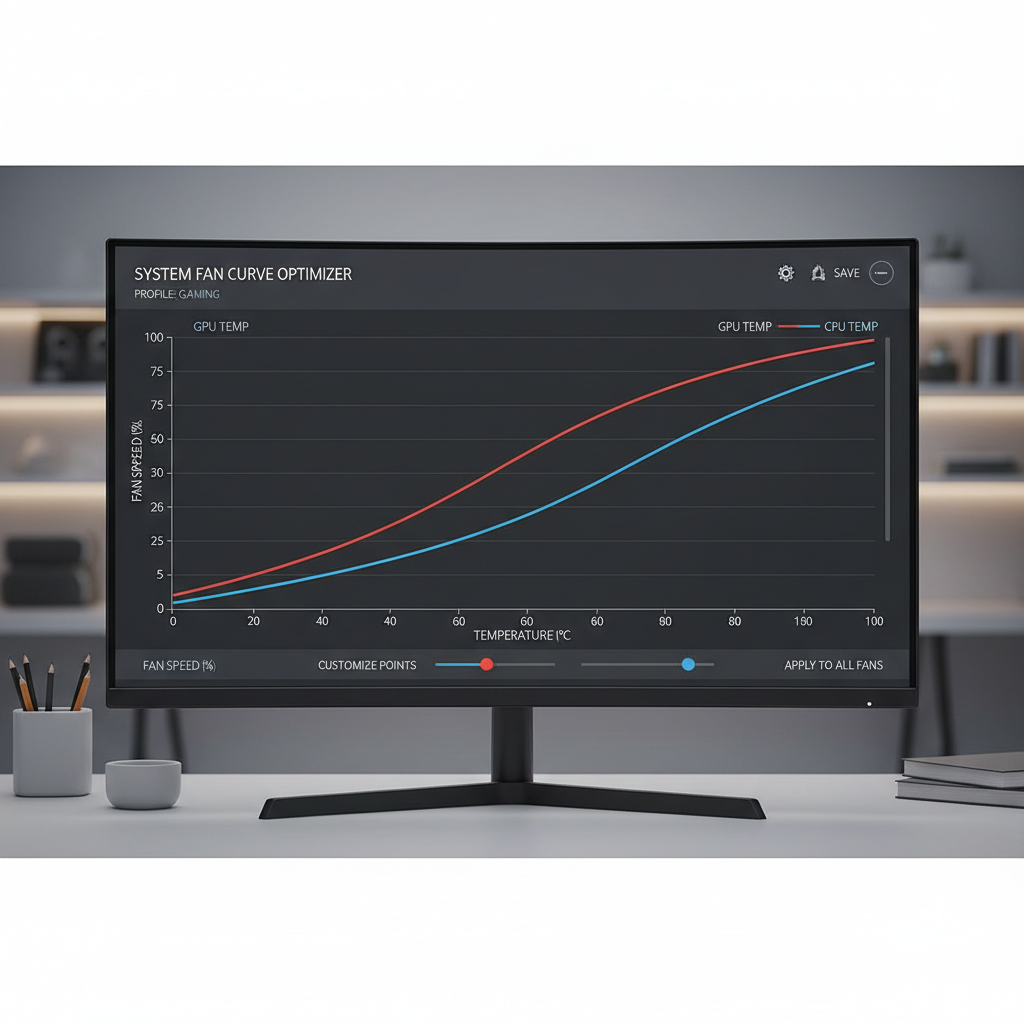
Fan curve presets you can copy (CPU, GPU, and case)
These presets are starting points for best fan settings for gaming pc tuning. You’ll still adjust based on your cooler, case airflow, and what noise you personally tolerate.
Baseline temperature-to-fan table (a practical starting point)
Use this table as a sane default. If your fans have a “minimum duty” below which they stall, raise the low-end percentage until they spin reliably.
| Temperature | CPU Cooler Fan | GPU Fan | Case Fans |
|---|---|---|---|
| ≤ 40°C | 20–30% | 0–25% (or stop mode) | 25–35% |
| 50°C | 35–45% | 30–40% | 35–45% |
| 60°C | 50–60% | 45–55% | 50–60% |
| 70°C | 65–75% | 60–70% | 65–75% |
| 80°C | 80–90% | 75–85% | 80–90% |
| 85°C+ | 95–100% | 90–100% | 90–100% |
Preset A: Quiet-but-safe for typical 1080p/1440p gaming
This works when your case airflow is decent and your GPU does most of the work.
- CPU fan: gentle ramp until 60°C, then steady climb; avoid big jumps between 55–70°C.
- GPU fan: start earlier than “silent” presets, but cap peak RPM if the cooler gets loud.
- Case fans: tie to GPU temperature if your motherboard supports it, otherwise a blended sensor or a higher fixed baseline.
Preset B: Performance-first for hot rooms, small cases, or high-end GPUs
When heat soak is your enemy, the mid-range matters more than the top end.
- Raise the 50–70°C zone by 10–15% on case fans to flush heat before it accumulates.
- Start GPU fans earlier to avoid hotspot spikes that trigger sudden loud ramps later.
- Keep CPU curve responsive above 70°C, because spikes during loads can be short but brutal.
How to set fan curves step by step (without chasing your tail)
The cleanest workflow is: stabilize airflow first, then tune noise, then fine-tune reaction speed. If you do it backwards, you’ll keep “fixing” symptoms.
- Step 1: Pick your control tools: BIOS/UEFI for motherboard fans, GPU software for GPU fans (or a unified tool if you know it’s stable on your system).
- Step 2: Set a reliable minimum RPM: find the lowest percent where each fan never stalls, then add a small buffer.
- Step 3: Flatten the low end: keep 30–50°C relatively calm, so browsing and menus don’t trigger noise.
- Step 4: Boost the mid-range: adjust 55–75°C to prevent long-session creep.
- Step 5: Add smoothing: set ramp-up time (or hysteresis) so quick spikes don’t cause constant “revving.”
- Step 6: Stress test with the games you actually play: run a real match or a heavy open-world area for 20–30 minutes, then adjust one thing at a time.
If you’re aiming for best fan settings for gaming pc with minimal noise, the “one change at a time” rule matters more than people want to admit. Otherwise you’ll never know what fixed what.
Common mistakes that make a “good curve” fail in real use
A lot of curves look perfect on paper and still feel bad day to day. These are the usual reasons.
- Case fans bound to CPU temp only: in many gaming builds, GPU heat dominates the case, so CPU-based case curves react late.
- Overly steep breakpoints: going from 40% to 70% over a 5°C window often causes audible oscillation.
- Too much “0 RPM” behavior: fan-stop can be great, but if your case traps heat, the first ramp becomes loud and abrupt.
- Ignoring hotspot: GPU edge temp may look fine while hotspot runs much higher, which triggers aggressive fan behavior.
- Dust and filters: clogged front filters quietly ruin airflow, then you blame your curve for what’s really restriction.
Also, don’t assume louder always means safer. A noisy system can still throttle if airflow direction is wrong or if the hottest component is not the one controlling the fans.
When to stop tweaking and consider hardware or expert help
If you keep raising fan speeds and temps barely improve, you might be at a hardware limit rather than a settings problem.
- CPU still hits 95–100°C quickly with high fan speeds: check cooler mounting pressure, thermal paste application, and whether pump speed is set correctly on AIOs.
- GPU hotspot stays very high despite aggressive fan: could be a cooler contact issue, aged thermal paste, or a design limitation, and warranty considerations may apply.
- Fans make grinding/clicking noise: that’s not tuning, that’s a mechanical issue, consider replacing the fan.
- You smell burning or see instability: power delivery and component safety become priorities, and it’s reasonable to consult a qualified technician.
According to AMD, Ryzen processors are designed to dynamically manage frequency and voltage based on temperature and power limits; if your system constantly rides the edge, you can get inconsistent performance even when “average temps” look okay. If you’re unsure, it’s fine to ask a local PC shop to sanity-check cooling and airflow.
Conclusion: a simple way to land on settings you’ll actually like
The best results usually come from a calm low end, a stronger mid-range to prevent heat soak, and smoothing to stop the ramping drama. If you only take two actions, make your case fans react to GPU heat in gaming scenarios, then tune the 55–75°C range until long sessions feel stable.
Key takeaways:
- Mid-range fan speeds often matter more than the 100% “panic zone.”
- Sensor choice decides whether your curve reacts to the right heat source.
- Smoothing/hysteresis is the secret to less annoying noise.
Open your monitoring overlay, run one game for 20 minutes, then adjust one breakpoint. That’s the fastest path to best fan settings for gaming pc without overthinking it.
FAQ
What are the best fan settings for gaming pc if I only care about low noise?
Start with a higher minimum on case fans (steady airflow) and a smoother CPU curve, then cap GPU fan RPM slightly below the point where noise gets sharp. Many quiet builds fail because fans sit too low until heat suddenly forces a loud ramp.
Should case fans follow CPU temperature or GPU temperature?
For most gaming-focused PCs, GPU temperature is the more useful driver because it’s the main heat source during gameplay. If your motherboard can’t use GPU sensors, raising a fixed baseline on case fans often works better than a purely CPU-based curve.
Is it safe to run GPU fans at 0 RPM when idle?
Usually yes if your case has decent airflow, but in smaller or warmer cases it can cause heat buildup that leads to an abrupt ramp later. If your GPU constantly toggles fan-stop on and off, a small always-on minimum speed tends to feel nicer.
Why do my fans keep ramping up and down in menus?
Menus can spike frame rates and power draw, which creates quick temperature swings. Adding hysteresis or a longer step-up time, plus flattening the curve below roughly 55–60°C, typically reduces that “revving.”
What CPU temperature should I aim for while gaming?
Targets vary by CPU and cooler, but many builds feel comfortable when sustained gaming stays below the high 80s°C and avoids constant throttling behavior. If you routinely see 95°C+ quickly, it’s worth checking cooler setup rather than only changing fan curves.
Do I need separate fan curves for summer and winter?
In many homes, yes, room temperature shifts can move your whole system up or down by several degrees. A “summer profile” with slightly higher mid-range speeds can prevent heat soak without making idle noise worse.
Can the “best fan settings for gaming pc” reduce stuttering?
They can if stuttering comes from thermal throttling or heat-related boost behavior. If stutter happens even at stable temps, the cause might be drivers, storage, or CPU scheduling, so treat fan tuning as one part of the checklist.
If you’re trying to dial in a curve but keep bouncing between “too loud” and “too hot,” it may help to share your cooler type, case model, and typical CPU/GPU temps under one game load, then build a couple of profiles you can switch between for quiet nights and competitive sessions.